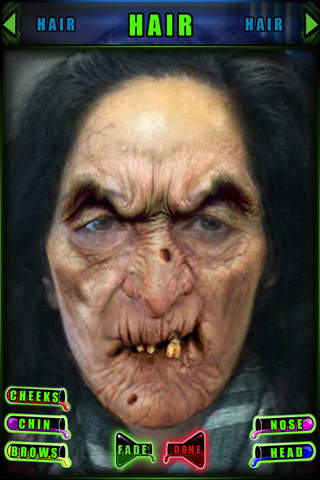
iMut8r app for iPhone and iPad
Developer: Legacy Effects LLC
First release : 19 Oct 2009
App size: 403.35 Mb
iMut8r has now been updated for the iPhone 5 screen and IOS 7!! The App Store’s favorite creature feature face morphing program now takes full advantage of the resolution of the iPhone Retina Display, making for amazing and even more realistic transformations than ever before. Create ghoulish, scary, eye-popping Mut8shuns that are High Resolution and pop out of the screen with HD clarity.
There are 9 character sets to choose from, including Zombies, Vampires, Werewolves, Witches, Freakenthings, Demons, Ghouls, Creature From The Deep and The Creeping Flesh.
Switch between character sets and cross-morph your characters into amazing hybrid creations. Mix and match features to create new and impressive creations.
Use the unique “FADE” feature and enable a surprisingly realistic blend of the effects into your photos, resulting in subtle, disturbing, and often-hilarious finishing touches.
You will be amazed at how much fun it is to play with iMut8r, the combinations are endless
Save your Mut8shuns to your Camera Roll.
Add your Mut8shuns to your Facebook page.
Print your Mut8shuns.
And start the process all over, again, and again, and again.
Designed and created by Legacy Effects, a leader in special makeup and character effects, iMut8r allows you to create film quality effects on your own images.
iMut8r - The evolution of horror… a revolution in iPhone and iPad entertainment!
App Store App of the week
iMut8r Tutorials are located here:
http://www.imut8r.com/tutorials/
***** Some Useful Tips *****
Make sure you lock the “FADE” effect by clicking the Fade/Set button a second time or it will not keep your setting when you change screens! Use the “FADE” effect to create subtle and realistic blending
To rotate an effect layer plant one finger in place on or above object and rotate the other finger around it. This enables you to focus the rotation around a specific point. Rotation will not work if fingers are below effect.
***** How to Mut8 multiple People in one photograph *****
1 - Import your image from the camera or your photo library
2 - Image will load into the alignment page. You can now "Hide Alignment" to remove the frame and see your entire image. This is very useful when Mut8ing more than just a single subject or when your subject(s) are off center.
3 - click "Save alignment" (this will save that alignment to your Camera Roll and will speed up future Mut8ing of that image) or click "Next".
4 - Mut8 your first victim in whole or with just parts. You will need to pinch, scale and fade each layer now and align them onto your victims face.
5 - click "Done"
6 - on the save page, click "Switch Character" (this will in essence flatten the current Mut8shun you just did, and return you to the character selection page to begin Mut8ing the other people in your photo.)
7 - Repeat steps 5-7 until youve Mut8d everyone that you want to Mut8.
8 - click "Done" and then save as desired.


